ESXi 6.7: Installing modules from an USB drive
In this post, I will describe the process of installing modules (e.g. drivers) to a fresh VMware ESXi 6.7 installation without creating a custom ISO or via a network connection.
While there is information available online about installing modules uploaded to the data store or from a community hosted repository, this post shows how to avoid using the network on the target system at all. So this method is applicable for hosts who only have unsupported network cards.
For following this method you will need a USB thumb drive.
This post assumes you have a running ESXi installation on your target system. If you are not sure how to set it up, read more about installing ESXi 6.7 in the official VMware ESXi Installation and Setup Guide.
Requirements set, let's get down to business:
Acquiring the module
You can skip this step if you have already downloaded an offline installable bundle of the module.
In my case, I am using a network card on my host system that is no longer supported by recent ESXi versions.
To still utilize the network card, all I needed was installing the appropriate driver.
To find out the relevant network card, I logged into the local ESXi console using a connected monitor and switched to the shell as explained in the final step. On the local ESXi shell I typed:
[root@localhost:~] lspci -v | grep -A1 -i ethernet
0000:03:00.0 Network controller Ethernet controller: Realtek Semiconductor Co., Ltd. P8 series motherboard [vmnic0] Class 0200: 10ec:8168
After identifying the relevant controller I downloaded the offline bundle for that adapter from a community repository.
Setting up the USB drive
To be accessible from the internal shell, VMware ESXi requires USB drives to be formatted as FAT16.
Pick a USB drive of your choice and modify the existing partition table or create a new one. In this step, you will need to create a partition with a size of your choice but below 2GB. If you are not sure how to do that, I recommend to use graphical tools like GParted or the partitioning wizard in Windows.
Double-check the partition is using the FAT16 filesystem.
Now copy over the entire offline bundle ZIP-archive to the partition on the USB drive.
Installation on the target system
In this final step, you will need to perform console input using a keyboard on the ESXi host system.
After plugging in the USB drive, log into ESXi and enable the ESXi Shell (Troubleshooting Options) and switch to it by pressing ALT+F1.
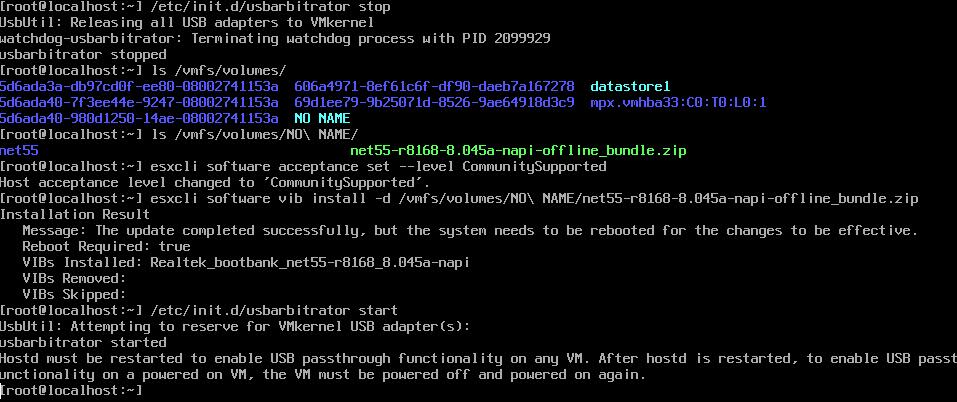
Enter the following commands as shown in the screen capture below:
- Stop the ESXi USB passthrough daemon to be able to access the drive in the shell:
/etc/init.d/usbarbitrator stop - Verify the USB appears as NO NAME:
ls /vmfs/volumes/ - Change the software acceptance level:
esxcli software acceptance set --level CommunitySupported - Install the module by pointing
to the absolute path to your module.esxcli software install vib -d - Optionally: Reboot your system to apply changes. The reboot will also restart the USB passthrough daemon.

Conclusion
After following these steps you should have successfully installed the required modules on a live ESXi 6.7 installation without the need to create a custom ISO or connect to an Internet service.
Thank you for reading and have a good time virtualizing your services.
Please note that neither I nor this website is affiliated with VMware. Apply changes at your own risk.